


How To Screenshot On iPad?
How to Screenshot on iPad: A Simple Step-by-Step Guide
Taking a screenshot on your iPad can be incredibly useful. Whether you want to capture an important moment, save a funny conversation, or keep a record of something you see online, knowing how to screenshot on iPad is a skill every iPad user should have. This guide will walk you through each step, using simple and straightforward language to make the process as easy as possible.
Why Take a Screenshot?
Before we dive into the steps, it’s worth understanding why you might want to know how to screenshot on iPad. Screenshots allow you to capture exactly what’s on your screen and save it as an image. You can then share this image with others, add it to your notes, or keep it for future reference. Whether you’re documenting a bug, saving a recipe, or capturing a high score in a game, learning how to screenshot on iPad can be very handy.
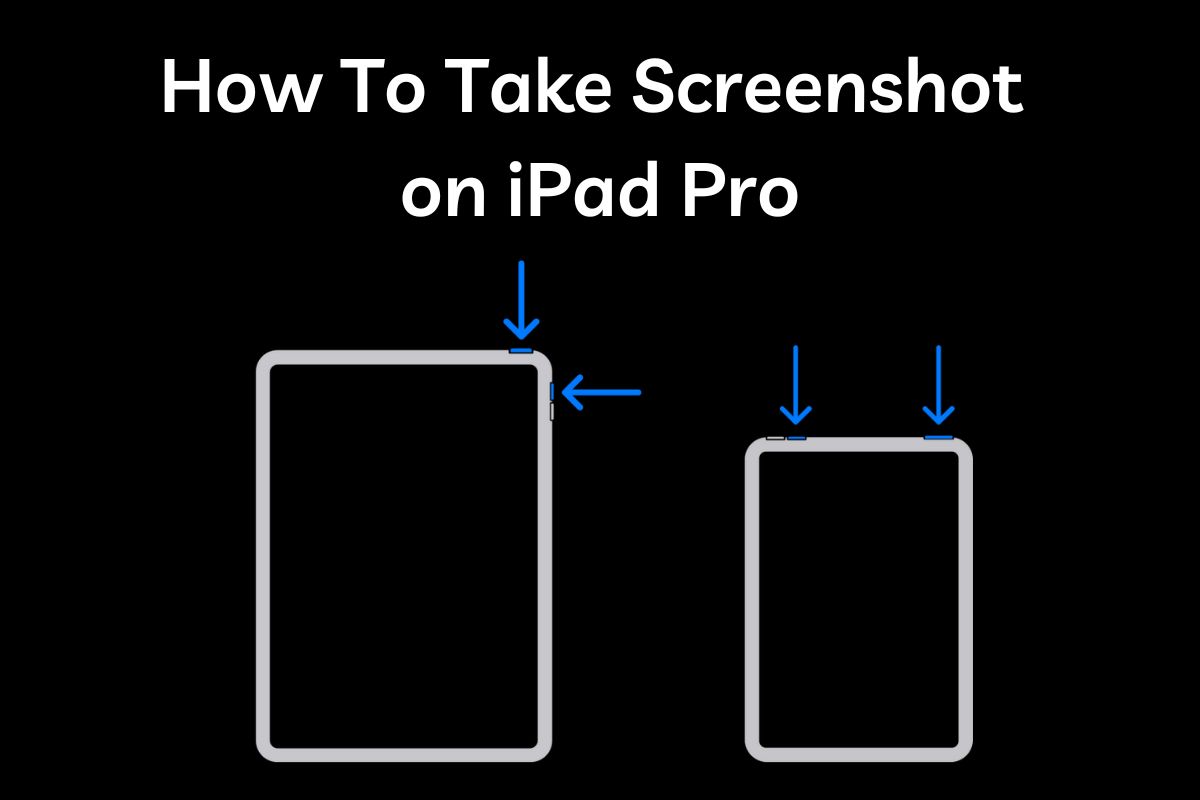
How to Screenshot on iPad with Physical Buttons
If you have an iPad with a Home button, or even if you don’t, the process of taking a screenshot involves using the physical buttons on the side of your iPad. Here’s how to screenshot on iPad using the buttons:
- Locate the Buttons: To take a screenshot on an iPad, you need to use two buttons simultaneously. On an iPad with a Home button, you’ll use the Top button (also called the Power button) and the Home button. On iPads without a Home button, you’ll use the Top button and the Volume Up button.
- Press the Buttons Simultaneously: Press and hold the Top button and the Home button at the same time. If your iPad doesn’t have a Home button, press the Top button and the Volume Up button simultaneously. You’ll know you’ve taken a screenshot when the screen briefly flashes white.
- Check the Screenshot: After you take the screenshot, a thumbnail of the image will appear in the bottom-left corner of your screen. You can tap on this thumbnail to edit or share the screenshot immediately, or swipe it to the left to dismiss it. The screenshot will automatically save to your Photos app.
- Find Your Screenshot: To access the screenshot later, open the Photos app on your iPad, go to the Albums tab, and select Screenshots. This is where all your screenshots are saved.
By now, you should feel confident in how to screenshot on iPad using the physical buttons. But what if the buttons are hard to press, or you want to take a screenshot in a different way? Don’t worry; there are alternative methods you can use.
How to Screenshot on iPad Using AssistiveTouch
AssistiveTouch is a helpful feature on your iPad that allows you to perform various actions without pressing physical buttons. If you prefer not to use the physical buttons, here’s how to screenshot on iPad using AssistiveTouch:
- Enable AssistiveTouch: First, you need to turn on AssistiveTouch. To do this, go to Settings > Accessibility > Touch > AssistiveTouch and toggle the switch to turn it on. A small, floating button will appear on your screen.
- Customize the Menu: You can customize the AssistiveTouch menu to include a screenshot option. In the AssistiveTouch settings, tap Customize Top Level Menu and choose an empty slot (or replace an existing action) with the Screenshot function.
- Take the Screenshot: Now that you’ve set it up, you can take a screenshot at any time by tapping the floating AssistiveTouch button, then selecting Screenshot from the menu. Your iPad will capture the screen just as it would with the physical buttons.
- Access Your Screenshot: Just like with the physical buttons, your screenshot will appear as a thumbnail in the corner of the screen, and it will be saved in the Screenshots album in the Photos app.
Using AssistiveTouch is a great option if you find it challenging to press the physical buttons or if you simply prefer a different way to take screenshots.
How to Screenshot on iPad with the Apple Pencil
If you have an Apple Pencil, you can also use it to take screenshots on your iPad. Here’s how to screenshot on iPad using the Apple Pencil:
- Open the Screen You Want to Capture: Navigate to the screen on your iPad that you want to capture.
- Use the Apple Pencil: With your Apple Pencil, swipe up from the bottom-left corner of the screen toward the center. This action will instantly capture a screenshot.
- Edit or Share Your Screenshot: Once you take the screenshot, it will appear as a thumbnail in the corner. Tap on it to edit, mark up, or share it directly from the screen.
- Save the Screenshot: As with other methods, the screenshot is automatically saved in the Screenshots album in the Photos app.
The Apple Pencil method is particularly useful for those who frequently use the Apple Pencil for other tasks, as it’s a quick and easy way to capture what’s on your screen.
Tips for Managing Screenshots on Your iPad
Now that you know how to screenshot on iPad in various ways, here are a few tips for managing your screenshots:
- Organize Screenshots: If you take a lot of screenshots, it might be helpful to create albums within the Photos app to organize them by category, such as work, personal, or creative projects.
- Edit Screenshots: The Photos app offers basic editing tools that allow you to crop, adjust, or mark up your screenshots. This can be useful if you need to highlight specific parts of the image.
- Share Screenshots: You can easily share your screenshots through messages, email, or social media directly from the Photos app.
- Delete Unnecessary Screenshots: To keep your iPad storage from filling up, regularly review and delete screenshots you no longer need.
Conclusion
Learning how to screenshot on iPad is a simple process that can be done in several different ways, depending on your preferences and the tools you have available. Whether you use the physical buttons, AssistiveTouch, or an Apple Pencil, taking a screenshot is quick and easy. By following the steps outlined in this guide, you’ll be able to capture and save anything you see on your iPad screen in no time. Enjoy capturing those important moments, and now that you know how to screenshot on iPad, make the most out of this handy feature!


Post Comment