


How To Connect Apple Pencil To iPad?
How to Connect Apple Pencil to iPad: A Simple Step-by-Step Guide
The Apple Pencil is an excellent tool for enhancing your iPad experience. Whether you’re taking notes, drawing, or simply navigating through your device, the Apple Pencil adds a level of precision and creativity that you can’t get with just your fingers. If you’ve just gotten an Apple Pencil and are wondering how to connect Apple Pencil to iPad, you’re in the right place. This guide will walk you through the process step by step, using simple language that’s easy to follow.
Understanding the Different Apple Pencils
Before diving into how to connect Apple Pencil to iPad, it’s essential to know which version of the Apple Pencil you have. Apple has released two versions of the Apple Pencil:
- 1st Generation Apple Pencil: This version has a rounded design and a removable cap that covers the Lightning connector.
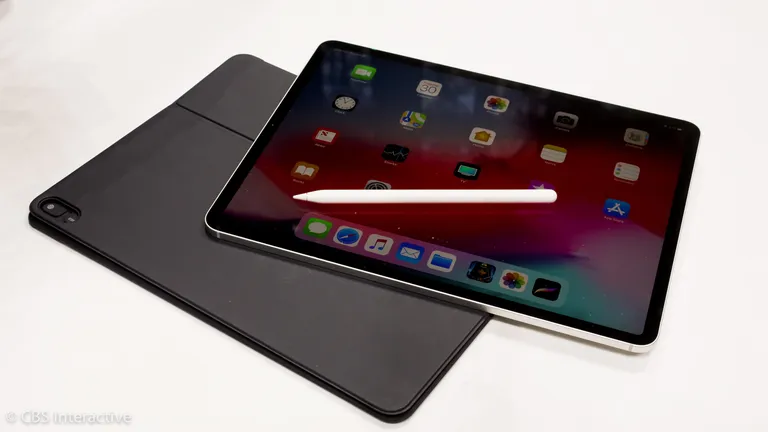
- 2nd Generation Apple Pencil: This version has a flat edge and attaches magnetically to the side of the iPad.
The steps on how to connect Apple Pencil to iPad vary slightly depending on which version you own, so make sure you know which one you have before you begin.
How to Connect Apple Pencil to iPad (1st Generation)
If you have the 1st generation Apple Pencil, follow these simple steps to connect it to your iPad:
- Remove the Cap: Start by removing the small cap at the end of the Apple Pencil. This cap covers the Lightning connector, which you’ll use to connect the pencil to your iPad.
- Plug It into Your iPad: Next, plug the Lightning connector of the Apple Pencil directly into the Lightning port on your iPad. Make sure it’s securely connected.
- Pair the Apple Pencil: Once you’ve plugged in the Apple Pencil, a prompt will appear on your iPad screen asking if you want to pair the Apple Pencil with your iPad. Tap “Pair” to confirm.
- Start Using Your Apple Pencil: That’s it! You’ve successfully learned how to connect Apple Pencil to iPad. Your Apple Pencil is now paired and ready to use. You can start writing, drawing, or navigating your iPad with the Apple Pencil right away.
Remember, the 1st generation Apple Pencil charges by being plugged into the iPad’s Lightning port, so make sure you charge it when the battery is low.
How to Connect Apple Pencil to iPad (2nd Generation)
If you have the 2nd generation Apple Pencil, the steps on how to connect Apple Pencil to iPad are even simpler:
- Attach the Apple Pencil Magnetically: The 2nd generation Apple Pencil connects to the iPad differently. Instead of plugging it in, you simply attach the Apple Pencil to the magnetic connector on the side of your iPad. The flat edge of the Apple Pencil should align with the magnetic strip on the iPad.
- Pair the Apple Pencil: As soon as you attach the Apple Pencil magnetically, your iPad will recognize it and display a pairing prompt. Tap “Pair” to connect your Apple Pencil to the iPad.
- Start Using Your Apple Pencil: After pairing, your Apple Pencil is ready to use. It also charges while it’s attached to the iPad, so you don’t have to worry about running out of battery during use.
By now, you should be comfortable with how to connect Apple Pencil to iPad, whether you’re using the 1st or 2nd generation. The process is straightforward, allowing you to quickly start enjoying all the features that the Apple Pencil offers.
Troubleshooting Tips for Connecting Apple Pencil to iPad
If you’re having trouble figuring out how to connect Apple Pencil to iPad, here are some simple troubleshooting tips:
- Check Compatibility: Ensure that your iPad is compatible with your Apple Pencil model. Not all iPads support both generations of Apple Pencil, so double-check this if you’re experiencing issues.
- Restart Your iPad: If the pairing prompt doesn’t appear when you try to connect your Apple Pencil, try restarting your iPad. This can resolve minor software glitches that might prevent the Apple Pencil from connecting.
- Ensure Bluetooth Is On: For the pairing process to work, Bluetooth needs to be enabled on your iPad. You can check this in the Control Center or in the Settings > Bluetooth menu.
- Charge Your Apple Pencil: If your Apple Pencil isn’t connecting, it might be out of battery. Plug it in (1st generation) or attach it magnetically (2nd generation) to charge it up.
These simple steps should help you troubleshoot any issues you encounter while trying to connect your Apple Pencil to your iPad.
Benefits of Knowing How to Connect Apple Pencil to iPad
Learning how to connect Apple Pencil to iPad opens up a world of possibilities for how you can use your iPad. With the Apple Pencil, you can:
- Take Notes: Whether you’re in a meeting, classroom, or just jotting down thoughts, the Apple Pencil makes note-taking on your iPad feel natural and fluid.
- Draw and Design: Artists and designers will love the precision and control that the Apple Pencil offers. You can sketch, draw, and create detailed artwork directly on your iPad.
- Edit Documents: Mark up PDFs, sign documents, and make annotations quickly and easily with your Apple Pencil.
- Navigate Your iPad: Use the Apple Pencil to interact with your iPad’s interface more precisely, making tasks like editing text and selecting items easier and more accurate.
Conclusion
Now that you know how to connect Apple Pencil to iPad, you’re ready to explore all the creative and productive possibilities that come with it. Whether you’re using the 1st generation or 2nd generation Apple Pencil, the process is simple and straightforward. Just follow the steps outlined in this guide, and you’ll have your Apple Pencil connected and ready to go in no time. Enjoy your enhanced iPad experience!


Post Comment